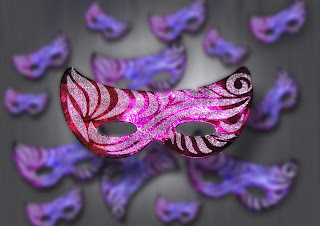
 The following instructions on how to create a simular image of your own have been inspired by a workshop shown in 'Digital Photo' February 2009. This is the description of how I created the above image.
1. Choose one simple object e.g scissors, a mask, knife, fork. Place object on A4, plain, white paper. Take several shots until you are happy. Load up in Element 6. Open Full Edit.
2. Go to File, New Blank File. Width 29.7cm, Height 21cm, Canvas at 300ppi, O.K. Edit, Fill Layer, choose 50% Gray in the 'Use'. O.K. Filter, Render, Fibers, Variance & Strength set at 10, Randomise, O.K. Press Ctrl & 'U' on the keyboard, click colorize box & adjust Hue & Saturation e.g Hue @ 240, Saturation @ 20. O.K. Save as 'Master Image'. File, Open and choose your basic object from your photos. Windows, Image, Cascade shows both images in seperate boxes. Resize as you see fit. Click on the basic box (the one with your object).
3. Use Magnetic Lasso Tool or if you right click on the tool, other options will appear. Depends what you're used to. OR you can use Quick Selection Tool. I used Magnetic Lasso Tool to carefully go around object. Undo if you go wrong. If you use a mask/scissors, remember to go around the eye sockets/finger holes. Click 'Move' tool, drag across to Master Image. If the object is blank, then 'Undo' and on the basic copy, Select, Inverse and drag across to Master Image again. I moved my Mask to the center.
4. In 'Effects' palette on the right (if not open, go to Windows, Effects). Click on 'Layers Style' icon & select 'Drop Shadows' in the bar to the right. Drag 'High' preset to apply a drop shadow. Layer, Layer Style, Style Settings, adjust Shadow size: 50, Distance: 50, Opacity: 60. O.K.With 'Move' tool selected, hold down Alt, click and drag your object on the screen to make a copy. Ctrl & 'U', make sure colorize is ticked, change Hue to e.g -155 for cool blue. O.K. Change the size (a simular lined box appears and works simular to a crop tool), rotate, position where you want. Right click, Send Backwards, so the copy of your object sits behind the main object. Continue to use Alt & drag method, rotating and resizing and more layers will be added each time.
5. Click on main central object, Layer, Layer Style, Style Settings, adjust & change Size: 170, Distance: 280, Opacity: 60, O.K. Can alter the other scissors in the same way. Take all the eyes off of the layers until until last one (which should be the background) is visable.
6. Click the half black/half white circle in the Layers Palette box, pick Hue/Saturation. Move Saturation +50, Lightness -70. Click on 'Paintbrush' tool. Check 'black' is in forefront of colour box (bottom left hand corner). Use a very large, soft edged brush(e.g 1700 pixels), reduce Opacity to 30%. Sweep across central area to create vignette. Bring back other layers by clicking the eyes back on. Layers, Visable Merge. Save, Layers, Duplicate Copy. Use Magnetic Lasso Tool / Quick Selection Tool to outline main object. Filter, blur, Gaussian blur set to 20. Save as whatever your new title is.
Use Eraser tool to tidy and edges if you have missed them with the lasso tool.

No comments:
Post a Comment